I’m going to try to write some tutorials that answer questions that sometimes come up at meetups. I don’t know if this information is too dense or not useful enough, but feedback is welcome and I’ll keep trying to adjust things as I write more. 
How to Make Node.js Web Servers
This is a short tutorial that explains how Node.js servers work at a basic level. Some of the information applies to web servers in general. If you are a little uncertain about how “the backend” works in general, this tutorial might help.
The tutorials assumes some basic knowledge of JavaScript.
A link to the finished code in a Github repo is at the bottom of this post.
Install Node.js
To see if Node.js is installed, open a terminal and type this (not including the dollar sign, which just represents the terminal’s prompt).
$ node -v
If you have Node installed, you should see output something like v14.0.0, which is my current version at the time I updated this tutorial. It’s okay if you see a different version number — the code below should still work.
If you don’t have Node installed yet, you can install it with these instructions: [Tutorial] How to Install Node.js on Linux, Mac, and Windows
Create a Node.js Project
Create a new directory for your server and create a file named package.json with the following contents:
{
    "name": "node_server",
    "private": true,
    "version": "0.1.0",
    "description": "A Node.js server example",
    "main": "server.js",
    "scripts": {
        "start": "npx nodemon server.js"
    },
    "license": "BSD-3-Clause",
    "devDependencies": {
        "nodemon": "^2.0.3"
    }
}
A package.json file provides information about your project and tells Node what other software dependencies are needed in order to run your app.
Then type this to install the dependency:
$ npm install
The single dependency there in the package.json file is nodemon, which is a tool that restarts your Node program whenever you save a file in your project.
The npm install should create two new things in the project directory:
- A file named
package-lock.json. You can ignore that for now and learn about it later. You won’t have to edit it or do much with it in most cases. - A directory named
node_modules. That’s where all the dependencies are stored (in this case, just thenodemonprogram). You won’t have to do anything with that directory either, so just leave it for now.
That package.json file sets things up so that you can start your server with npm start and it will keep reloading your app while you work on it. You could alternatively start the program by typing node server.js, but then you would have to manually restart the server every time you change a file.
If you’re using Git (optional), be sure to create a file named .gitignore (with the leading dot) and add this line to it:
node_modules/
That will prevent you from accidentally saving the dependencies (extra programs that your code depends on, like nodemon) in the Git repo.
Now the initial setup is done.
Writing the Server
Create a file named server.js and import Node’s built-in http library like this:
const http = require("http");
Importing a library gives your program extra functionality. There are several ways to import functionality into a file in JavaScript (including Node.js) — the most common way to do it in Node.js is called CommonJS, which is the syntax we’re using here.
After writing that first require line in the file, you can refer to all the HTTP functionality in that library by using the name http.
A Side Note on CommonJS Imports/Exports
You might hear the word “module” while working with Node.js. A module just means a file. Your module (the file) can only see functions and variables that exist in that file. To get functions from other files your file (module) has to import them. The other file has to explicitly export that functionality as well. A lot of detail about how to do that is beyond the scope of this tutorial, but the short explanation is that you can import functionality from a module (file) like this:
If you have a file named hello.js with these contents:
// filename: hello.js
function helloWorld() {
    return "hello world";
}

// make the function available for other modules to import
module.exports = helloWorld;
you can then import its function in another module (file) like this:
// filename: script.js

// import the function that was exported from `hello.js`
const helloWorld = require("./hello");

// now you can use the function from the other module
const result = helloWorld();

console.log(result);
// prints "hello world"
If you create those two files and type node script.js, it will print the result.
If the other module or library is built-in to Node or was installed with npm, you can refer to it just by name like this:
const http = require("http");
But if the other module is a file in your project, it needs to be referenced by the relative path, using a leading dot. (The dot-slash refers to the current directory that the file sits in). So, to reference the hello.js file from the script.js file, above, you use a leading dot-slash:
const helloWorld = require("./hello");
For this tutorial all you really need to know is that the require function will import functionality from another library or module and assign it to a name that you can use in the current file.
Back to the Server Code
The http object that you imported has a method named createServer. You can use it like this:
const server = http.createServer(/* the server's functionality goes here */);
To create the server’s functionality, we can pass in a function that has two parameters: request and response:
const http = require("http");

function requestHandler(request, response) {
    console.log("got a request!");
    // To send back a response, you can use the `end` method:
    response.end("here is your response");
}

// Pass the function into the server
const server = http.createServer(requestHandler);
There is one more step — run the server. Put the code below at the bottom of the server.js file to tell it to listen on port 3333. Other common ports are 3000, 8000, and 8080. I chose 3333, because it isn’t commonly used, and you’ll be less likely to see an error than if you use port 3000 which might clash with another app that could be running in another terminal on your computer.
server.listen(3333, () =>
    console.log("server is listening at http://localhost:3333/")
);
The complete server.js file should now look like this:
const http = require("http");

function requestHandler(request, response) {
    console.log("got a request!");
    // To send back a response, you can use the `end` method:
    response.end("here is your response");
}

// pass the function into the server
const server = http.createServer(requestHandler);

server.listen(3333, () =>
    console.log("server is listening at http://localhost:3333/")
);
Then try starting the server by typing this in your terminal:
$ npm start
The terminal should output something like this:
$ npm start

> npx nodemon server.js

[nodemon] 2.0.3
[nodemon] to restart at any time, enter `rs`
[nodemon] watching path(s): *.*
[nodemon] watching extensions: js,mjs,json
[nodemon] starting `node server.js`
server is listening at http://localhost:3333/
Don’t worry if the output in your terminal is a little different. The important part is that it should say “server is listening at http://localhost:3333/” on the last line.
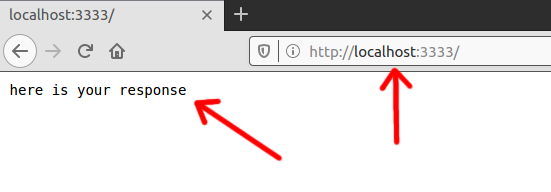
Open a browser (I recommend Firefox), and visit localhost:3333.
You should see the text you passed to the response.end method on the page.
What Is Happening?
When you type a URL into a browser’s address bar, it sends a request to a server. The request is usually a bit of text that contains information for the server.
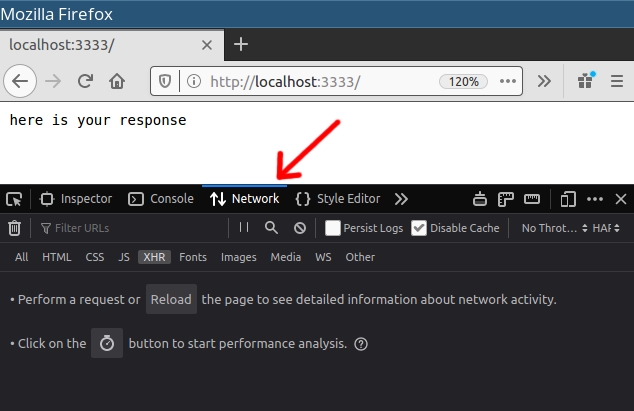
It’s possible to inspect that text in the browser. In Firefox, you can open the Network Monitor by pressing Ctrl+Shift+E (or Command+Option+E on Mac). You should see something like the screenshot below.
(Tip: for dark mode, check the settings or download Firefox Developer Edition.)
To see the requests, reload the page. Make sure that “All” is selected. You can ignore the line that says “favicon.ico” if it shows up there. The line we’re interested in has a slash (/) in the “File” column. A slash represents a directory, and the root directory of your site is just /. The URLs for the root of virtually all domains have a slash on the end, though modern browsers misleadingly hide that information in the address bar.1 

Click on the slash character in the “File” column to open up a pane on the right that will show details about the information your browser is sending to the web server.
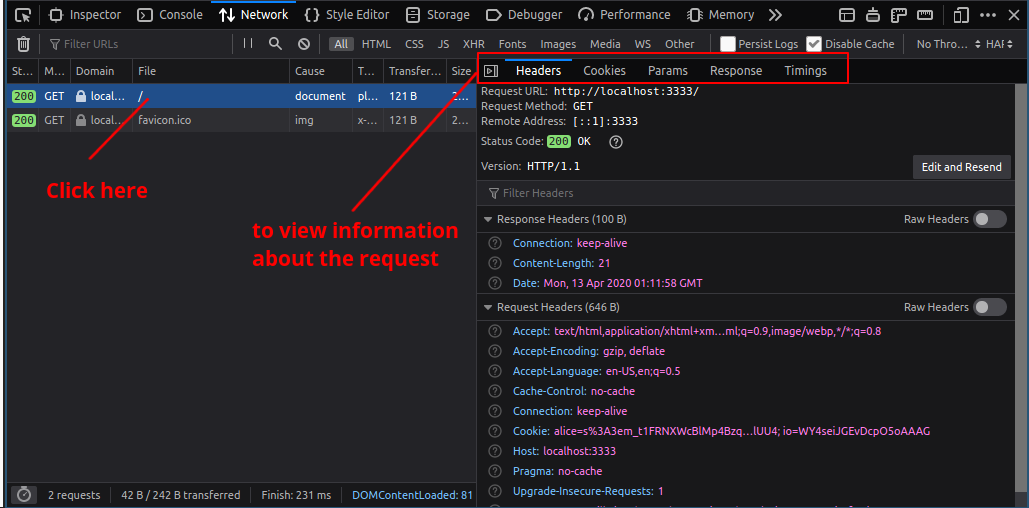
Click the “Edit and Resend” button on the right and take a look at the raw text that is there. Your version will probably be a little different in places, but on my computer it looks like this:
Host: localhost:3333
User-Agent: Mozilla/5.0 (X11; Ubuntu; Linux x86_64; rv:75.0) Gecko/20100101 Firefox/75.0
Accept: text/html,application/xhtml+xml,application/xml;q=0.9,image/webp,*/*;q=0.8
Accept-Language: en-US,en;q=0.5
Accept-Encoding: gzip, deflate
Connection: keep-alive
Upgrade-Insecure-Requests: 1
Pragma: no-cache
Cache-Control: no-cache
Those are key-value pairs that allow the browser to tell the server what it should send back.
To see that information on the server side, you can extract the headers out of the request object by using request.headers.
Change the requestHandler function in the server.js file so that it looks like this:
function requestHandler(request, response) {
    console.log(request.headers);
    response.end("here is your response");
}
Now, when you reload the page in the browser (to resend the request to the server), the server will print something like the following in the terminal:
{
  host: 'localhost:3333',
  'user-agent': 'Mozilla/5.0 (X11; Ubuntu; Linux x86_64; rv:75.0) Gecko/20100101 Firefox/75.0',
  accept: 'image/webp,*/*',
  'accept-language': 'en-US,en;q=0.5',
  'accept-encoding': 'gzip, deflate',
  connection: 'keep-alive',
  pragma: 'no-cache',
  'cache-control': 'no-cache'
}
The key-value pairs that were sent by the browser were parsed into a JavaScript object. Since the headers are now a JS object, you can easily use them in your server code.
Those headers aren’t all the information that the browser is sending though. There’s also a bit of information that Firefox displays in the “Request Method” area:
If you want to see what the full raw information looks like you can make a request with a program called curl. It’s something like Postman (if you’re familiar with that), but runs in the terminal.
After installing curl (type “how to install curl <mac, linux, or windows>” in a search engine), type the following command in a terminal window:
$ curl -v http://localhost:3333/
It will print the outgoing headers, which should look something like this:
GET / HTTP/1.1
Host: localhost:3333
User-Agent: curl/7.47.0
Accept: */*
You can also try another path, like a (nonexistent) /about page:
$ curl -v http://localhost:3333/about
It sends this request:
GET /about HTTP/1.1
Host: localhost:3333
User-Agent: curl/7.47.0
Accept: */*
and gets this response:
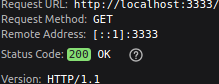
HTTP/1.1 200 OK
Date: Mon, 13 Apr 2020 02:29:03 GMT
Connection: keep-alive
Content-Length: 21
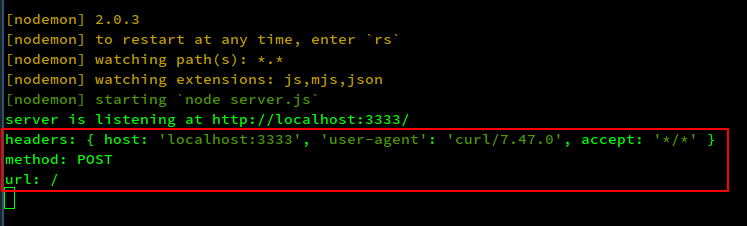
Check your terminal where the server is running, and it should have logged the headers, something like this:
{ host: 'localhost:3333', 'user-agent': 'curl/7.47.0', accept: '*/*' }
{ host: 'localhost:3333', 'user-agent': 'curl/7.47.0', accept: '*/*' }
The Node server isn’t picking up the first line from the sent information in its own request.headers object. To get that information, you can use other functions.
Change the requestHandler function so that it looks like this:
function requestHandler(request, response) {
    const headers = request.headers;
    // This extracts the method ("GET", "POST", etc.)
    const method = request.method;
    // This extracts the path, like "/" or "/about"
    const url = request.url;

    console.log("headers:", headers);
    console.log("method:", method);
    console.log("url:", url);

    response.end("here is your response");
}
Reload http://localhost:3333/ in the browser and you should see information like this printed in the server’s terminal window:
method: GET

url: /

headers: {
  host: 'localhost:3333',
  'user-agent': 'Mozilla/5.0 (X11; Ubuntu; Linux x86_64; rv:75.0) Gecko/20100101 Firefox/75.0',
  accept: 'image/webp,*/*',
  'accept-language': 'en-US,en;q=0.5',
  'accept-encoding': 'gzip, deflate',
  connection: 'keep-alive',
  pragma: 'no-cache',
  'cache-control': 'no-cache'
}
If you instead load http://localhost:3333/about, the url will change to /about.
If you make a POST request to the server with curl, the method will change from GET to POST. Try it by sending a POST request with this command:
$ curl -X POST http://localhost:3333/
The output in the server’s terminal will show that it knows that it has received a POST request:
Where Things Are Going
Now that our server can see what information the browser is requesting, it can conditionally send back responses based on the information it receives.
Change the requestHandler function so that it looks like this:
function requestHandler(request, response) {
    const url = request.url;

    // This is a primitive server-side router.
    if (url === "/") {
        response.end("home page");
    } else if (url === "/about") {
        response.end("about page");
    } else {
        response.end("page not found");
    }
}
Then load these three URLs in your browser to see the responses:
http://localhost:3333/http://localhost:3333/abouthttp://localhost:3333/doesnt-exist
The response that the server sends back will now change based on what URL your browser requested. 
Why People Use Web Frameworks
You could slowly build up the functionality of your server by adding functions to do more-robust routing, read in template files, send back proper status codes, store cookies, and all the other tasks a website usually needs, but most people don’t want to write a whole web framework from scratch each time they build a website.
That’s what server-side web frameworks are for.
You can build a web server in any language, and there are web frameworks in just about every common language. The most common one for Node.js is called Express.js.
Express.js handles a lot of the common boilerplate for you so don’t have to write it yourself. Express is lightweight and doesn’t have a lot of features, but there are many libraries that you can use to quickly add functionality.
A Simple Express Server
It’s easy to change our existing server so that it uses Express.js.
Stop the Node server we wrote by pressing Ctrl+c in the terminal window where it’s running.
Then install Express in the project by typing:
$ npm install --save express
Change the server.js file so that it contains this code:
// import express
const express = require("express");

// create an Express application
const app = express();

// define what the pages should send
function homePage(request, response) {
    response.send("home page");
}

function aboutPage(request, response) {
    response.send("about page");
}

// Mount the pages at the desired paths.
//
// Note that Express checks for the `GET` method by
// using `app.get`. If you wanted to listen for `POST`
// requests, then you would use `app.post`.
app.get("/", homePage);
app.get("/about", aboutPage);

app.listen(3333, () =>
    console.log("server is running at http://localhost:3333/")
);
Then start the server again with npm start and try visiting these three URLs:
http://localhost:3333/http://localhost:3333/abouthttp://localhost:3333/doesnt-exist
The server should behave in a similar way as our lower-level Node.js server, but now there are a lot of built-in features that can make developing a real website much easier.
Adding More Features
In order to have our app serve HTML, we can add a templating engine. There are many options to choose from — I like Handlebars.js. To install it, stop the server with Ctrl+c and type:
$ npm install --save hbs
Then add these three lines to the server.js file:
const path = require("path");
app.set("views", path.join(__dirname, "views"));
app.set("view engine", "hbs");
That tells Express to use Handlebars and to look inside a directory named views for the HTML templates.
Create the views directory and put a file in it name page.hbs. The basic structure of your app should look something like this (possibly with some extra stuff in it, but these are the important files):
.
├── package.json
├── package-lock.json
├── server.js
└── views
    └── page.hbs
The page.hbs file should contain this content:
<!DOCTYPE html>
<html lang="en">
    <head>
        <meta charset="UTF-8">
        <title>{{title}}</title>
    </head>
    <body>
        <nav>
            <a href="/">Home</a> | <a href="/about">About</a>
        </nav>
        <h1>{{title}}</h1>
        <p>{{body}}</p>
    </body>
</html>
Then update your server.js file so that it looks like the code below. The parts that changed are the two functions, homePage and aboutPage.
const express = require("express");
const path = require("path");

const app = express();

app.set("views", path.join(__dirname, "views"));
app.set("view engine", "hbs");

function homePage(request, response) {
    // This data object could come from a database or anywhere you want.
    const pageData = {
        title: "Home Page",
        body: "content coming soon",
    };
    response.render("page.hbs", pageData);
}

function aboutPage(request, response) {
    const pageData = {
        title: "About Page",
        body: "lorem ipsum",
    };
    response.render("page.hbs", pageData);
}

// mount the pages at the desired paths
app.get("/", homePage);
app.get("/about", aboutPage);

app.listen(3333, () =>
    console.log("server is running at http://localhost:3333/")
);
The response.render method takes two arguments: the name of a Handlebars file in the views directory, and a JavaScript object that contains the data that should be injected into the Handlebars template.
Since the page.hbs Handlebars template contains placeholders for two variables, named title and body, like this…
<h1>{{title}}</h1>
<p>{{body}}</p>
…we can pass the template a JavaScript object that has keys that match those variable names:
// a JS object with keys that match the template variables
const pageData = {
    title: "Home Page",
    body: "content coming soon",
};

// pass the JS object to the template
response.render("page.hbs", pageData);
Express’ response.render method will then send the server-rendered HTML to the browser.
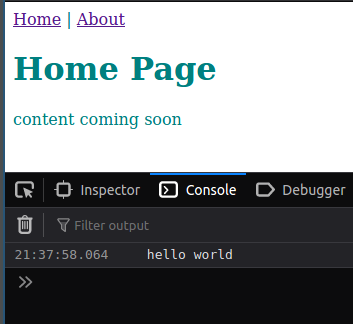
Both pages should now display correctly, even though they are simple.
Here is the output from http://localhost:3333/

And here is the output from http://localhost:3333/about

One HTML (or Handlebars) template is able to render different content, and the data is cleanly separated from the display of that data (“the view”).
You can navigate between the pages with the menu at the top of the page.
Add Static Assets
The next step is to add a little styling. The server.js file needs one line of code to tell Express where to find the static assets, like frontend JS and CSS.
Right after these two lines in server.js…
app.set("views", path.join(__dirname, "views"));
app.set("view engine", "hbs");
…add this line:
app.use(express.static(path.join(__dirname, "public")));
That tells express to look in a directory named public for the static files. Create the public directory and add two files to it, named main.js and styles.css. The structure if the project should look something roughly like this now:
$ tree -I node_modules
.
├── package.json
├── package-lock.json
├── public
│   ├── main.js
│   └── styles.css
├── server.js
└── views
    └── page.hbs
Update the page.hbs file so that it now looks like this with the stylesheet and JavaScript files included:
<!DOCTYPE html>
<html lang="en">
    <head>
        <meta charset="UTF-8">
        <title>{{title}}</title>
        <link rel="stylesheet" href="/styles.css">
    </head>
    <body>
        <nav>
            <a href="/">Home</a> | <a href="/about">About</a>
        </nav>
        <h1>{{title}}</h1>
        <p>{{body}}</p>
        <script src="/main.js"></script>
    </body>
</html>
There are two new lines there that load the following assets:
main.jsstyles.css
To make sure that everything is wired together correctly, put the following code into the files in your public directory.
For public/main.js:
console.log("hello world");
For public/styles.css:
body {
    color: teal;
}
Save the files and reload http://localhost:3333/ to make sure that the frontend CSS and Javascript files are loading. The text color should change, and the browser console should have logged “hello world”.
Where to Go From Here
If you want, you can try making additional pages, editing the CSS, and or JS, and tinkering with the site.
The Express.js docs are good.
Extra: Middleware
The way that middleware works in Express is interesting. A middleware is just a function that accepts three arguments: a request, response, and optionally a next. You can manipulate the request and response and then call next to send the request on to the next middleware in the chain.
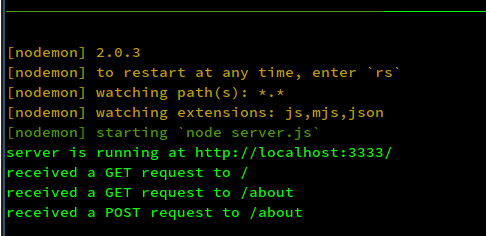
Here’s an example of a custom logging middleware that you could put near the top of your server.js file that would log the method and path of every request:
// This works as middleware because it takes three args and
// calls the third one at the end.
function loggingMiddleware(request, response, next) {
    // logs some data
    console.log(`received a ${request.method} request to ${request.url}`);

    // sends on the request to the next middleware function
    next();
}

// Mount the middleware on the app
app.use(loggingMiddleware);
The server will then print out the logging information like this:
Express is built with chains of middleware functions — even the routing functions are middleware. They take request and response, but because they are the last middleware in the chain, instead of calling next() they call a method like response.render to send the result back to the browser.
The example logging middleware runs on all routes, because it wasn’t passed a route parameter:
// This middleware runs on all routes.
app.use(loggingMiddleware);
If app.use is given a route, then the given middleware function will only run on that route. That’s how the router sends the results of specific middleware functions when it receives requests to certain routes, like the About Page:
// This middleware only runs on http://localhost:3333/about
app.use("/about", aboutPage);
It might take a while of tinkering with Express before the middleware concept makes sense, but go through a few Node.js tutorials and poke around in the docs a bit, and it will start to become clearer.
If anyone has questions or notices any errors, leave a comment below.
The final code can be downloaded from the Github repo.
If you want to add a database, try this: [Tutorial] How to Use MySQL or MariaDB with Node.js and Express
Footnotes
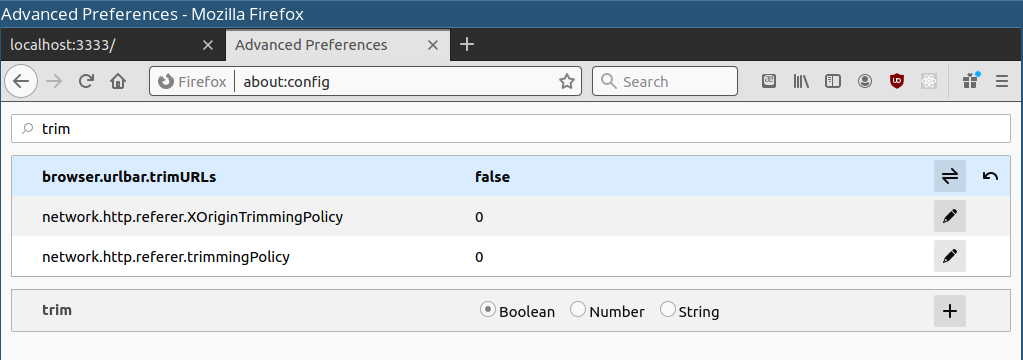
1 To fix URL trimming in Firefox, type about:config in the address bar to open up the Advanced Preferences page. Ignore the warning about a warranty if you see it. Filter the items for the word “trim” and look for the setting named browser.urlbar.trimURLs. Double-click it to set it to false, and then close the tab. The browser should display full URLs correctly after that. Here’s a screenshot: