[Tutorial] Quickstart a React Site and Blog with GatsbyJS

Update: this tutorial is probably outdated. See the official Gatsby quickstart for current information.

This is a quick tutorial about how to quickly build and deploy sites using GatsbyJS. It’s designed for people who know at least a little React and want to try Gatsby.

The starter template I made could be used as a base for a portfolio website and includes a blog feature. It should be pretty easy to edit the design, and add new content types and other features.

What Is Gatsby?

React is a JavaScript library. There are several tools out there to help with creating React sites. Three of the common ones are:

  • create-react-app
  • Next.js
  • Gatsby

Each tool creates a different kind of React site.

This tutorial covers Gatsby, which I think is the best everyday method for creating a content-heavy site in React.

(Tip: Vue has the same kinds of tools: vue-cli, Nuxt, and Gridsome. I’m planning to write some Vue tutorials soon.)

Example sites that use Gatsby include: the official React JS site, National Geographic, DigitalOcean, TypeScript, and Figma.

Why Gatsby?

Single-page applications (SPAs) generally aren’t good for content-heavy websites. Sometimes they can be indexed by search engines, but even when they are, they don’t rank as well. If people can’t find your site by searching for it, it won’t get as much traffic.

Frameworks like Gatsby (also Next, Nuxt, and Gridsome) solve that problem by rendering the output as HTML files on the server. Search engines can then read the content just like they could from any regular HTML file. But after the first page load, the sites become SPAs, with all of the speed benefits of SPAs.

Also, the server-rendered JavaScript frameworks still allow you to easily add dynamic frontend code on top of the HTML pages in almost the same ways as writing typical SPA code.

So with Gatsby, you get most of what you get from create-react-app but also better search engine traffic and additional features.

How to Install Gatsby

If you don’t already have Node.js installed check out this page: [Tutorial] How to Install Node.js on Linux, Mac, and Windows

After Node.js is installed, install Gatbsy by running this command in a terminal:

$ GATSBY_TELEMETRY_DISABLED=1 npm install -g gatsby-cli

After it installs, permanently disable the telemetry with:

$ gatsby telemetry --disable

UPDATE: Gatsby 3 lets you start new Gatsy sites like this:

$ npm init gatsby

Then answer a few questions about the features you want.

My Gatsby starter still works, but you can also use the init command and then use my starter for ideas. See the comments below for more discussion about it.


(I think that development tools and NPM packages shouldn’t be sending unknown data to remote servers.)

Starting a Gatsby Project

Run this command to start a new Gatsby site using my starter template, changing “project_name” to the actual name of your site:

$ gatsby new project_name https://github.com/j127/gatsby-starter-website-blog

There are many starter templates to choose from. The one I’ve created helps you get a site online faster, because many things are already configured for you. If you use the built-in starter instead of my template, it will take longer to build something, because you’ll have to learn how to wire up the GraphQL with some content source before you can build something.

You’ll still need to learn the GraphQL part later, but I think it’s motivating to have a site online, so I’d recommend putting a site into production before worrying about learning every detail of the framework first.

The starter template has these features:

  • Pages
  • Blog (written with markdown)
  • RSS feed at /rss.xml
  • Syntax highlighting in blog posts
  • SCSS support
  • Bulma CSS framework (you can easily replace it with Bootstrap or whatever you want)
  • Easy deployment to Netlify
  • and more

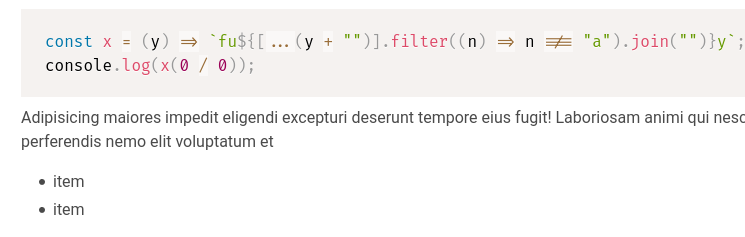
I also tried to include some examples of common tasks, like how to make a grid with Bulma. If you get stuck thinking things like, “I need to figure out how to make a grid in Bulma”, you can use a search engine to find this page, or just look at the example in the src/pages/index.js file in the starter template. :slight_smile:

<!-- I used Bulma, because it's this easy. -->
<div className="columns">
    <div className="column">Column 1</div>
    <div className="column">Column 2</div>
    <div className="column">Column 3</div>
</div>

Starting the Development Server

After running the setup commands, cd into the project directory and run this command to start the development server:

$ npm start

Then visit localhost:8000 in your browser to view the site.

As you edit the site, the page will automatically reload with the changes.

Quick Tour

If you’ve used create-react-app before, the structure should appear familiar:

$ tree -d -I node_modules
.
├── content
│   ├── assets
│   └── blog
│       ├── another-post
│       └── first-post
├── src
│   ├── components
│   │   ├── footer
│   │   ├── layout
│   │   ├── navbar
│   │   └── seo
│   ├── images
│   ├── pages
│   ├── styles
│   └── templates
└── static

Pages

Any React component that you put into the src/pages directory will become a path on the site. For example, the file src/pages/about.js will be viewable at localhost:8000/about/ (note the trailing slash).

Links

To link to another page on the Gatsby site, use syntax like this:

<Link to="/about/">About Page</Link>

A Link element will tell Gatbsy to preload the target page as soon as the mouse hovers over it, making the page load almost instantly.

For external links, use regular <a> elements.

Blog Posts

If you want a blog, put your blog posts in the content/blog directory. Use the same structure as the two sample blog posts. Any images that you put in a blog post directory will be included in the final output.

Other Content Types

If you want other content types (something other than pages and blog posts), check out the section of the docs on source plugins.

Static Files

Put any extra static files into the static directory. For example, the robots.txt file is at static/robots.txt and will appear in the final build at example.com/robots.txt. It gets copied to the final build but doesn’t need to be processed on the way.

Styles

To edit the styles, check out the Bulma docs. SCSS support is already enabled — just name the files with a .scss extension. Whenever I want to do something with Bulma, like figure out the styling for navbars, I’ll just type “bulma navbar” into Google and end up in the docs.

Bulma has a lot of SCSS variables that you can override. You can change their values in the src/styles/_variables.scss file and Bulma should update.

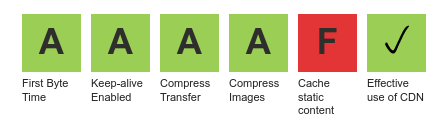
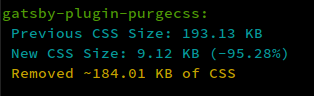
The included template uses PurgeCSS to strip out all unused CSS styles, so the final build is small. Out of the box it should remove about 95% of Bulma’s CSS weight.

PurgeCSS Gatsby

GraphQL

To understand how the GraphQL queries work, check out the running queries with GraphQL section of the docs.

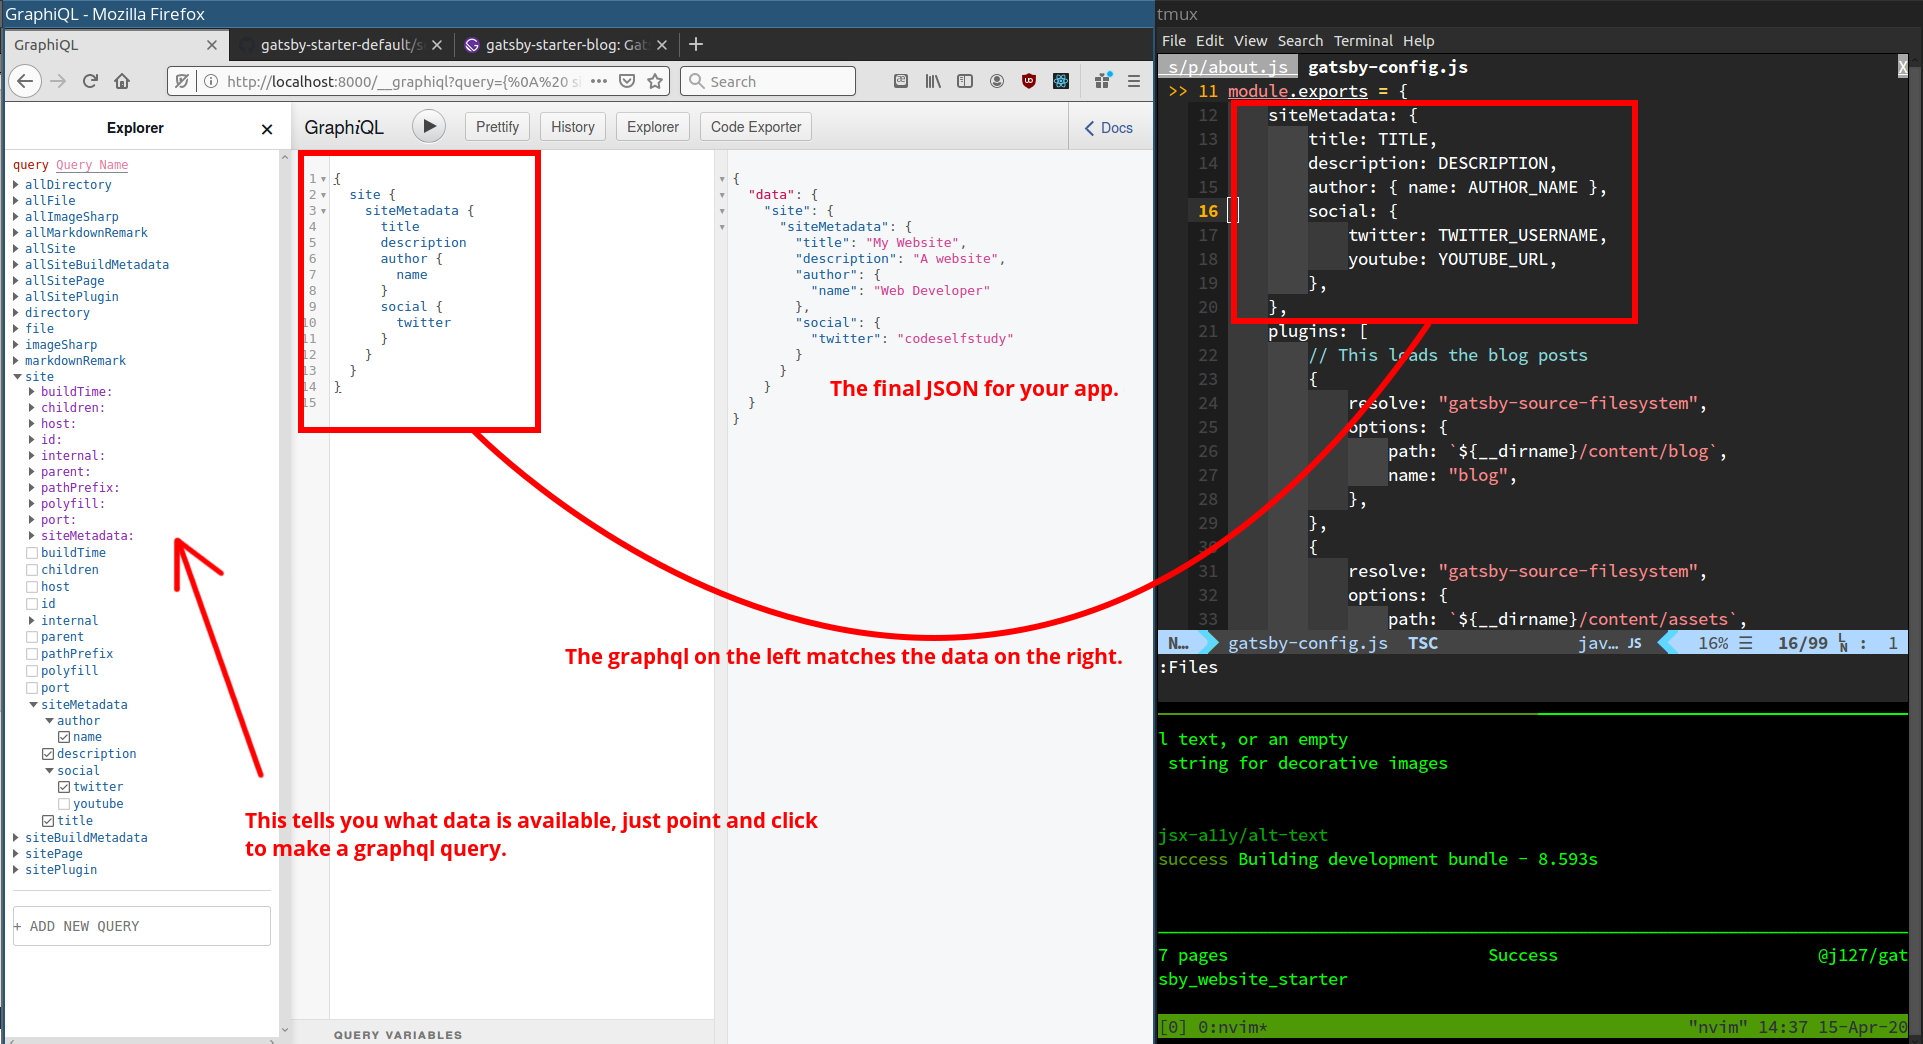
Basically you can visit localhost:8000/__graphiql to see a GraphQL explorer where you can see what data sources Gatsby knows about. Point-and-click until you construct the correct query. Then run the query to fetch the data. The docs above show how to use the returned JSON in your code.

In this screenshot, the query is fetching data from the file gatsby-config.js file. You can query files, databases, APIs, the filesystem, or just about anything else, using the same syntax.

Looking Things Up

If you don’t know how to do something while working on the site, go to the Gatsby docs and look it up. If you need a feature, check the plugin directory to see if a plugin already exists.

Also, feel free to post questions below or send me a message in the chatroom. :slight_smile:

Deploying the Site

After you edit the site and add features (similar to how create-react-app sites are built) you can deploy it to production on Netlify (free).

First build the site:

$ npm run build

The built website files will appear in a directory named public.

Then deploy it to Netlify using the tutorial here: Netlify CLI Quickstart

Your site will then be online.

I’ve intentionally kept this page short and simple so that people can follow a few instructions and get a site online instead of spending hours on longer tutorials.1.

If that was too much information for a first introduction to Gatsby, try going through the slower official tutorial and then come back here and use this template for your second site. To learn a technology, it’s good to build many things with it repeatedly, until the basic tasks are in muscle memory. :slight_smile:

If you have questions, leave a comment below.


Footnotes

1 For longer, free tutorials, see this, this, and this and/or search this forum for “gatsby”.

3 Likes

↑ The main goal there is to help get people quickly get real websites online that anyone can find in search engines. Having people use the things you build can provide motivation to keep working on them, and you can dive deeper into Gatsby’s features as you work on them. That’s why it is very short and to the point of getting websites into production.

2 Likes

Today, there were two small bug fixes in the Gatsby template. If anyone is using the template, you can fix your version by making these two changes.

This fixes how the syntax highlighting works during development:

[Edit: I removed the links, because the repo moved, and this comment is old.]

The template is Free, open-source software. Feel free to make pull requests. :slight_smile:

I fixed two more bugs with the template.

Bug 1

The first one fixes blog post URLs. If you want to update your local site, check the changed files in the pull request below. I also added an author field to the blog metadata and change the blog post folder structure so that the blog posts will list in chronological order.

Bug 2

This one adds author metadata to blog posts and centers the navbar text in a container, along with some other minor CSS fixes. See the “Files changed” tab in the pull request here if you want to update your version.

Edit: I made a mistake and forgot these changes. This prevents PurgeCSS from ripping out the CSS for tables when a blog post contains a Markdown table.

I don’t really have much to add @PaulH. The Gatsby docs are excellent and well written. Josh’s quick start notes are also superb. I’m still a little confused about SEO implementation and GraphQL. Gatsby is very fast and worth trying.

2 Likes

Yeah, I didn’t know this tutorial was here. Looks great.

I ran codeselfstudy.com through web.dev and the scores are really good.

Running it through web page test reveals ~240kb of javascript, which is a fair amount in my book:
https://www.webpagetest.org/result/200603_WE_872a7a217a1c18540a4d970a32950594/

But may not matter for SEO, so maybe it is just my own OCD on bytes. :wink:

2 Likes

I took a quick look, and it appears to transfer about 338KB on the first page load then then only about 1KB on every other page load (when hovering over a link — clicking on the link doesn’t perform a new request, so the next page displays instantly). I guess that’s a tradeoff with SPAs, since it needs to load the engine. :slight_smile:

(Svelte has a different tradeoff — it creates smaller builds, but requires more manual configuration to get similar functionality.)

I’ll see if I can fix those other scores from webpagetest later.

I was going to fix this, but it looks like it might take some time to set up. I’m not sure if it’s worth it to spend too much time on at the moment. If anything, the page-data.json probably shouldn’t be cached because there is no cache busting on those files. :thinking:

Google’s web.dev tool gives better ratings.

The details page there suggests that caching could be improved, but I’m not sure if it’s critically important on a small site like this. :slight_smile:

1 Like

Oh yeah, Gatbsy is crushing it on web.dev!

I guess you still had to fill in a lot of the alt tags for accessibility right? But maybe gatsby defaults it to something or another, or maybe the image is tagged in JSON?

I know I am not one to talk, but I wouldn’t over obsess on webpage test. Take it from a recovering addict. :wink:
A one time 200K for a remaining 1k is really pretty good.
I also like how you can see plain HTML in the page source. Something I don’t think I saw with Svelte.

JSX is almost like HTML but you can inject variables into it and do some basic logic.

You can just write this in JSX:

<img src="https://placekitten.com/200/200" alt="cat" />

The only difference with HTML there is that the closing slash is required.

Or you can use the JSX to programmatically change the alt text and other aspects of the component like this:

const styles = {
    border: "1px solid #ccc",
    borderRadius: "5px",
    padding: "17px",
    margin: "7px",
};

// This component creates a new tag called <Image>
function Image(props) {
    return (
        <div className="image">
            <img style={styles} src={props.src} alt={props.alt} />
        </div>
    );
}

Then in any file you could do something like:

<Image src="https://placekitten.com/200/200" alt="cat" />

and the component would produce this custom image element, using whatever variables you passed into the function, and wrapped in the div with the custom styling you defined:

<div className="image">
    <img src="https://placekitten.com/200/200" alt="cat" />
</div>

That’s the server-side rendering. You can do it with Svelte, but I think there is an extra step.

1 Like

Thanks for the info. JSX looks like a good step from html.
Hmm, I tried to server side render svelte, but felt like I only saw compressed javascript. Perhaps I missed a step in there…Or the minimal HTML was just too compressed. Actually that is likely it, since I think I only outputted hello world.

I made a Codepen that can be edited. My syntax above had an error. I updated it. :slight_smile:

1 Like

Awesome thanks!
I am getting used to using JSON to organize content with handlebars too. I think once I get that going, it will be a lot easier to switch between platforms and frameworks. :slight_smile:

Definitely, an easier way to organize code and concepts.

1 Like

I was tinkering with Codepen a little. It gets more useful when you have repeated components, because you can then update functionality across the entire site at once. Like if you change the caption on line 14, all the <Image>s on the entire site will update.

1 Like

Yeah, it is even better with imports and exports as well. :slight_smile:
Thanks for the example.

I added a generator script to the repo. Instructions are in the README.md file.

Basically, you can start new blog posts by running this command:

$ ./g new 'The Title of Your Blog Post'

I just looked at those test results again. These were the grades:

image

I ran a new test here and the results were better:

image

I think I could get better caching by configuring nginx but haven’t done it, since those files are small and I’m not sure if it will be worth the time on a small site like that.

I think the “F” grade for security might be a mistake. For example, blog.codeselfstudy.com gets an “E” grade for security, but it’s a static site hosted on Netlify, and all the dependencies are up to date:

❯ npm audit

=== npm audit security report ===

found 0 vulnerabilities
 in 2650 scanned packages

It’s giving an “F” for caching, but the only caching problem is Google Fonts, which is served by Google and can’t be changed. :thinking:

I’ve been making some more improvements to the Gatsby starter template. It now uses the “Fira Code” font so that you get font ligatures in your code snippets (⇒, →, ≠, ≢,etc.) out of the box. The blog also now has a built-in RSS feed at /rss.xml.

An alternative to using markdown files for your content is Contentful. I found that these two links were a better intro to setting it up than the official Contentful tutorial. At the moment, Contentful is free for up to 25,000 items of content, 48 content types, and 5 editors. The main drawback is that they only let you host 50 MB of assets, so it would probably be better to host images locally.

Contentful gives you a web interface where you can add your content, and then your Gatsby site (or other kind of site) pulls it in with an API:

When I recommend to people that they should use Gatsby or Next.js for most things instead of create-react-app, I frequently see a lot of skepticism. I noticed today that even the official React.js website itself now uses Gatsby instead of create-react-app. :slight_smile:

I’ve build multiple projects with all three frameworks and these are my impressions so far:

  • Gatsby — probably the best React-based option for pre-rendered static site generation.
  • Next — use this if you want a quick Express.js backend that renders the HTML on each page-load. Might be more expensive to deploy, because it has a backend. It can also build the output to a pre-rendered static site, but doesn’t have as many performance optimizations as Gatsby. The differences are minor though.
  • create-react-app — only use this if you’re building an interactive app (like a game or dashboard), because it won’t rank well in search engines and people will have trouble searching for content. I think it’s a mistake to use create-react-app for any kind of content-based website.
1 Like