This tutorial is an attempt to explain what “components” are in JavaScript frameworks like React and Vue. I tried for a few weeks to make a video version of this, but there were too many errors in the recordings so I’m writing a text version. 
Target audience: you know some JavaScript but haven’t learned a framework like React or Vue yet, or you’re curious to see a walk through of a Vue component.
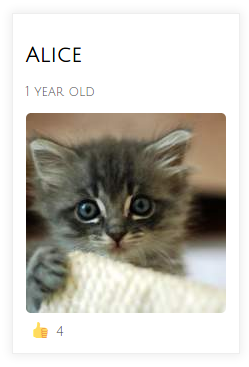
Preview: Example Application
Below is a screenshot of the simple app that I’ll use as an example. It displays cat data and lets you increment the number of “likes” by clicking on a cat’s “like” button.

Built-in HTML Elements
HTML provides many elements, each with different attributes and behaviors. For example, an <h1> element looks larger by default, maybe something like this:
![]()
Another example: an <img> element can have attributes like src and alt, which change the display of the img element. For example, this code:

produces this output:1

If you pass in a different value for the src attribute, a different image will display.
The attributes (src, alt, etc.) allow you to customize the look and behavior of the <img> element.
Other examples are HTML <button>, <select>, and <form> elements, which have certain built-in behaviors when they are clicked or submitted.
Custom Components
React and Vue components can be thought of as something like creating and using custom HTML elements. Instead of typing out code repeatedly, you can group the code together into a single file and refer to all of that functionality with a custom tag name.
In the case of the cats, we could create an component named “cat” that has all of the features we need, and then use it in our HTML something like this:
<cat name="Alice" age="1" likes="4" pic="https://placekitten.com/200/200" />
Instead of HTML’s built-in attributes (like src, alt, mentioned above), we can define our own attributes (“props”) to pass into the components.
The browser could then display each custom <cat> component like this, even pluralizing the word “year” correctly and keeping track of the number of times the “like” button is clicked:
Just like you can take a bunch of code and wrap it up into a function for easy reuse, you can take a bunch of HTML, CSS, and JavaScript, and wrap it up into a component for easy reuse.
D.R.Y. (Don’t Repeat Yourself)
As an example of the more difficult way, if you wanted to display just a cat photo with the cat’s name and age on a page multiple times, you could make a <div> element and fill it with a lot of repeated markup like this:
<section class="cats">

    <div class="cat">
        <h2>Alice</h2>
        <p class="metadata">1 year old</p>
        <img src="https://placekitten.com/200/200" alt="Alice" />
    </div>

    <div class="cat">
        <h2>Bob</h2>
        <p class="metadata">5 years old</p>
        <img src="https://placekitten.com/199/200" alt="Bob" />
    </div>

    <div class="cat">
        <h2>Cat Stevens</h2>
        <p class="metadata">3 years old</p>
        <img src="https://placekitten.com/200/199" alt="Cat Stevens" />
    </div>

</section>
For a small amount of code, it doesn’t matter, but if it grew to 20 cats on the page, a lot of code would start to be repeated.
Also, what if you wanted each cat to have extra functionality, such as the “like” button that increments the number of “likes” when it’s clicked? And then imagine that later you want to change one little thing, but now you have to change it in 20 places, because there are 20 cats on the page.
The more features each cat has, and the more complex the app becomes, the more spaghetti code you’ll end up with. Making changes to spaghetti code can be difficult.
<cat> Component Code Examples
I’ll use a JavaScript framework called Vue in this example, because it’s easier to learn and understand than React. Even if your main goal is to learn React, spending a week or two learning Vue first (using this guide), will make React easier to learn.
Here’s a codepen for people who prefer to jump ahead to the finished code. I put a lot of comments in the code. Maybe not all of it will make sense at first glance, but if you read through it a few times and try to link the variable names together between different parts of the files, it might make more sense. After that, read through the official Vue guide and it should start to make sense. (If not, ask me and I could answer questions on a Google Hangout while screensharing.)
When writing Vue code in a larger project, you can use a special syntax that is easier to write than raw JavaScript, but I’ll use the raw JavaScript version here, because it can run directly in browsers without needing to be compiled.
You can define a custom component (like <cat>) with this syntax:
Vue.component("cat", { /* functionality goes here */ });
For a simple component, you could define just a few bits of functionality:
-
props– the names of attributes that you will pass in to the component -
data– any data that needs to be stored and/or changed in the component -
methods– an object that contains functions that the component can run -
template– the HTML that defines how the component will look
See the examples and comments here:
Vue.component("cat", {
    props: [
        // This is an array of attributes that can be passed in
        // like <cat name="Alice" age="1" />
        "name",
        "age"
    ],
    data: function () {
        return {
            // This is where a data object is stored.
            // Example: `likes` could be stored here.
            likes: 0
        };
    },
    methods: {
        // Any functions you need can go here. For example, it will
        // need a function to increment the likes. Any `data` item
        // (see the `data` section above) can be accessed via `this`.
        likeCat: function () { this.likes += 1 }
    },
    // The `template` section is where you write the HTML that displays
    // the component. Variables are wrapped in double curly braces.
    // `@click` is special Vue syntax for an event listener. It can
    // bind to functions that are defined in the `methods` section
    // above. (Note: backticks are a way to write multi-line strings
    // in JS.)
    template: `
        <div>
            <h2>{{ name }} (age: {{ age }})</h2>
            <p>{{ likes }}</p>
            <button @click="likeCat">Click Here</button>
        </div>
    `
});
Here’s a codepen that uses the code above and creates a few <cat> components on the page.
A detailed explanation of how to create the entire component in the final codepen might not be as useful as taking a few afternoons to work through the official Vue guide, but I’ve posted the complete JavaScript below with detailed comments. I recommend reading the Codepen files in this order:
- Read the HTML
- Skim through the CSS (it’s Scss, but close enough to CSS that you don’t need to know Scss.)
- Read the JavaScript and comments carefully.
- Then read the HTML again and reference everything in the HTML section with the names in the JS section, and try to explain out loud how they are connected.
- Then do the same thing with the JS section: read it while explaining it out loud to an imaginary person, cross-referencing the names with other parts of the JS and the HTML. Example,
"name"(a string in the props) is available as a variable name as{{ name }}in thetemplatesection. And to pass thatnameinto the JavaScript from a variable in the HTML, it needs to be prefixed with a colon. Explaining things out loud helps me understand them, so I recommend it.
Here’s the JavaScript code (also available in the codepen).
// This defines the custom component: <cat></cat>
Vue.component("cat", {
    // `props` are the attributes that are passed in
    // to the component, like <cat name="Spot" age="2", etc.
    props: ["name", "age", "pic", "likes"],

    // Any data that you want to change goes in the `data`
    // section.
    data: function () {
        return {
            // It starts with the value of the prop that
            // gets passed in.
            internalLikes: this.likes
        };
    },

    // The `computed` section is for data values that need
    // to be computed. In this case, it dynamically checks
    // to see whether to pluralize the word "year".
    computed: {
        // You can then print out the result in the template
        // like this: {{yearWord}}
        yearWord() {
            return this.age === 1 ? "year" : "years";
        }
    },

    // If you want to run functions in the component, put
    // them in the `methods` section. The methods can access
    // the `data` items, defined above.
    // For example, `this.internalLikes`
    methods: {
        likeCat: function () {
            this.internalLikes += 1;
        }
    },

    // This is the HTML template for the component, with
    // special markup to add data variables, event listeners,
    // and method bindings.
    template: `
        <div>
            <h2>{{name}}</h2>
            <p class="metadata">{{age}} {{yearWord}} old</p>
            <img :src="pic" :alt="name" />
            <div class="likes">
                <button @click="likeCat">👍</button> <span>{{internalLikes}}</span>
            </div>
        </div>
    `,

    // This is a function that will run as soon as the app
    // has mounted the component.
    mounted: function () {
        console.log(`${this.name} component was mounted`);
    }
});

// The above code just defines how a `<cat>` component behaves.  The
// code below initializes and mounts a Vue application on the given
// element (`#app`), reading in the HTML and Vue-specific markup from
// that `#app` element.
new Vue({
    // This is the selector where Vue will be mounted.
    el: "#app",

    // This is the data that is available to the parent
    // component (which is the Vue application). The parent
    // component then passes the data down to each individual
    // `<cat>` component in the `v-for` loop.
    data: {
        cats: [
            {
                id: 1,
                name: "Alice",
                age: 1,
                pic: "https://placekitten.com/200/200",
                likes: 4
            },
            {
                id: 2,
                name: "Bob",
                age: 5,
                pic: "https://placekitten.com/199/200",
                likes: 7
            },
            {
                id: 3,
                name: "Cat Stevens",
                age: 3,
                pic: "https://placekitten.com/200/199",
                likes: 9
            }
        ]
    },

    // Since this is also a component, it has the same
    // lifecycle methods available here. You could fetch
    // JSON from an API here an assign it to the `data`
    // storage area (where the `cats` are currently being
    // stored).
    mounted: function () {
        console.log(`the parent component was mounted`);
    }
});
Footnotes
1 If you haven’t seen placekitten.com yet, it’s a website that you can use to load placeholder images in your websites while mocking up the design.